

Hey folks! 👋
Some of you might have realized my article publishing frequency went a bit stale for quite some time but you can be sure it was for a good reason… Especially because there is a silver lining to all of this!
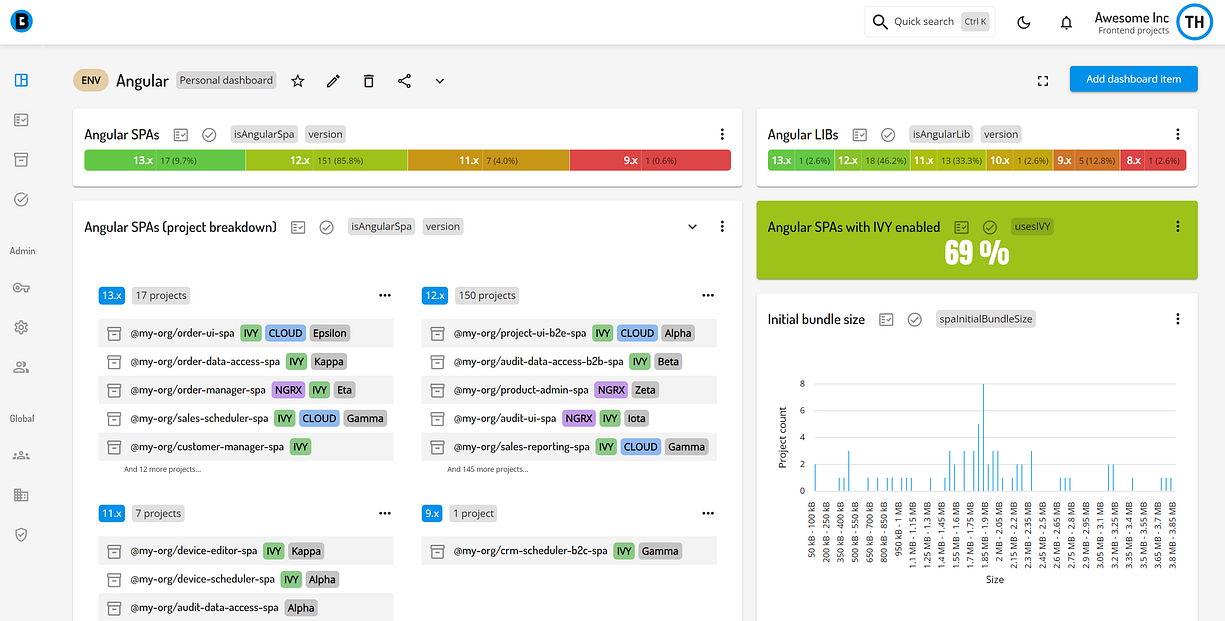
Last two years, I have spent all my free time developing OMNIBOARD — the best tool for software engineers that helps them to understand and evolve polyrepo environments of their enterprise organization, it has a pretty powerful free plan with unlimited projects so make sure to check that out! 😉
As you might have guessed, my preferred tools to work with are Angular & NgRx and that’s exactly what I used to build Omniboard!
Developing a SaaS product as a solo developer allowed me to gain valuable experience while being forced to be brutally honest about what does and doesn’t work!
And that’s exactly what I am going to share with you now!
While you might have figured out many of the best practices by yourself when using NgRx in one of your projects or by reading about them as there are many great NgRx articles out there, You can bet there is always that one or two things which are going to be new and worth learning, plus there will be realistic code examples for every tip!
⚠️ ☕☕☕☕☕ This is a pretty long article (~15min) so don’t worry about reading the whole thing in one go, just come back when you need to refresh specific part you’re working on.
TL;DR
- Use schematics to generate whole NgRx state features
- Recognize and leverage the NgRx 80/20 Rule
- When in doubt, pull your logic one level up (to preserve nice clean one way dependency graph)
- Create perfect view selector
view$( orviewModel$) for your container components - Always use
RouterStoreand its selectors to access router state - Always name (and implement) your actions as “events” instead of “commands”
- Embrace local selectors and actions specific to given container ( or interceptor, feature, … ) which makes implementing of other best practices a breeze
- Effects are for orchestration only, make sure that the actual logic is in services to keep the effects clean
- Effects can be triggered by ANY RxJs stream
- Get comfortable using Redux DevTools and prevent potential performance issues as your application state grows
NgRx General Tips
Use schematics to generate whole NgRx state features in one go
Schematics are one of the best things about using Angular to create our frontend applications!
Angular Schematics allow us to generate new workspace, application, architecture and every component, pipe or service with ease and hence not feeling any pain with regards to Angular’s explicit (some would say verbose) approach to building applications.
For example, running ng g m features/some-feature --route some-feature --module app in our terminal will create a whole new lazy loaded feature for our application which will be integrated in to the route configuration and comes with a container component out of the box. Yes, it can be that easy!
NgRx comes with its own schematics package called @ngrx/schematics which allows us to setup whole NgRx state features by running a single command.
Lets imagine we want to add new product feature (page) to our application. We can get a whole setup just by running two commands:
ng g m features/project --route project --module app
ng g @ngrx/schematics:feature features/project/state/project -a -c --module features/project/project
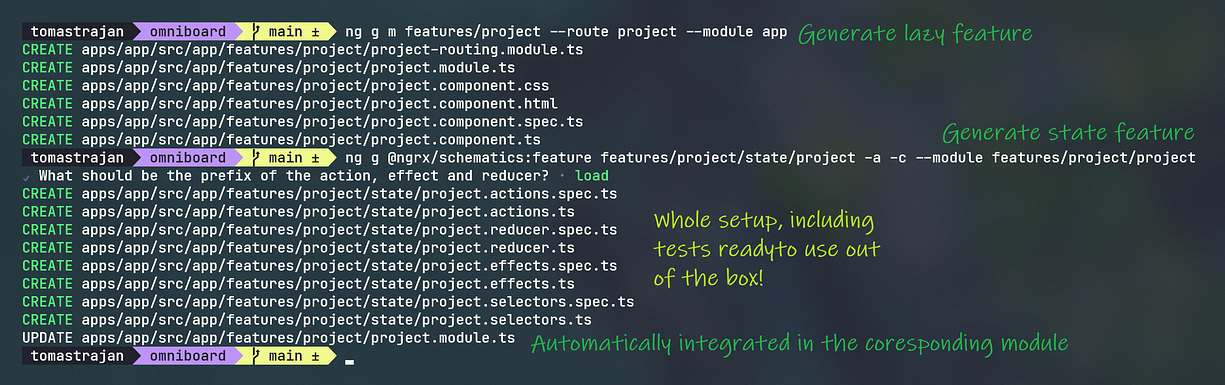
Besides obvious advantage like not spending time copying (or writing) the files by ourselves there is an additional benefit of consistency!
Consistency in naming, code style, patterns and general approach allows us to be effective when working on multiple features (or applications) from the get go and is one of the best things about Angular and NgRx based development!
🤔 Consideration: Sometimes, we might need more than one state module per feature as feature manages state of multiple entities. In that case the above mentioned schematics can be adjsuted to generate
state-<entity-name>/folder instead of plainstate/folder.That way our feature will stay clean and easy to understand, plus it will become easy to move our state slice around, for example in case we need to pull it one level up to the
core/so that it can be reused by more than one lazy feature of our application as will be discussed in dedicated section of this article!
Recognize and leverage the NgRx 80/20 Rule
With more than 2 million downloads per month, it should be pretty safe to state that NgRx is used by lots of folks out there!
The amount of users makes it that much more surprising that I have never seen it discussed online, the NgRx 80/20 rule!
The MOST GENIUS things about NgRx is that whole 80% of logic we have to write is just plain TypeScript functions which are NOT aware of Angular or RxJs
That’s right, the majority of NgRx implementation is as simple as it gets — just pure functions *— which are the simplest and easiest to understand building blocks of every programming language!

Let’s dissect this diagram further. The concepts implemented as data structure or pure functions* are:
- store — just an interface and initial state data structure
- reducers — pure functions
- selectors — pure functions*
- actions —data structures/pure functions*
* action creators and selectors could also be impure, for example when using something like
uuidto generate the payload but the purity claim will hold for most practical purposes 😉
- effects — Angular service (dependency injection), RxJs streams
On the other hand, last 20%, the NgRx effects are the only place aware of Angular as the NgRx effects themselves are implemented as Angular services so they can inject other services (store, http client, custom business logic services or anything else really…) and also implement logic with help of RxJs Observable streams.
In my experience, RxJs usually represents the most challenging part of the Angular application logic so it is important to point out that the NgRx Effects come with their own toned down / tamed version of RxJs streams:
- we do NOT have to manage subscription lifecycle as NgRx effects are subscribed by the NgRx when the effect is initialized
- streams are broken down into small chunks which are easier to understand, fix and evolve
- small effects can be composed effectively, eg effect A triggers B1 and B2, once both of them are done, the C is triggered (more on that in the dedicated effects orchestration part of this article)
The Benefits of NgRx 80/20 Rule
As we have discussed, up to 80% of NgRx based application code is implemented using plain data structures and pure functions which is great news as it makes the implementation and especially testing a very straight forward business!
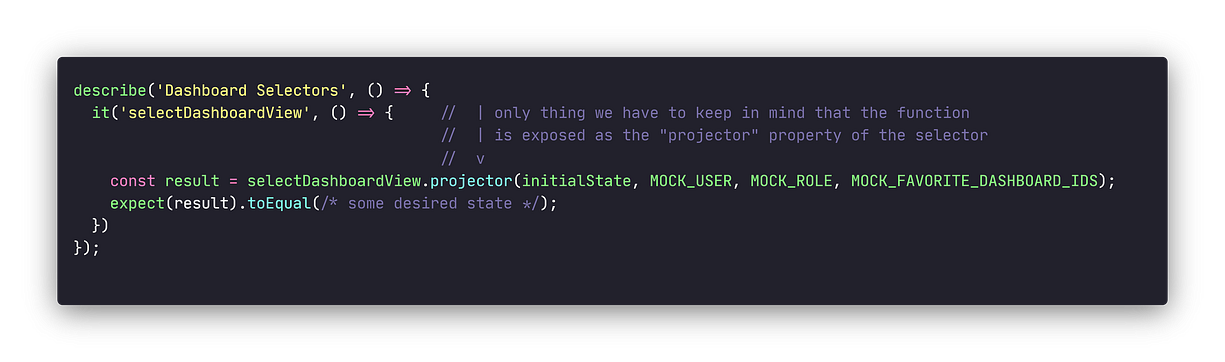
Let’s consider following example s— even though they might not seem the same on the surface — there is fundamentally no difference between something like function multiply and a reducer or a selector…

Excuse the following huge selector, you can ignore its implementation, the point is even though is large, it’s basically the same as the previous multiply function on the philosophical level (even though it could probably be further broken down in smaller parts for even easier testability and reusability…)

Such selector, even though contains a lot of implementation can be tested in a very simple fashion…
The same principles would apply to NgRx reducers and custom action creators which brings us to a final conclusion of NgRx 80/20 rule…
NgRx is great because it allows us to implement as much logic as possible (80%) in the form of simple pure functions which are easy to understand and test!
NgRx while purely RxJs stream based (selectors are consumed as RxJs streams in the component template or NgRx effects) cleverly abstracts those RxJs streams away so that we do not have to struggle to avoid all the pitfalls and complexity of dealing with such streams, and that’s the genius of its architecture, thank you @ngrx team!
One Way Dependency Graph -When in doubt, pull your logic one level up
Hopefully our Angular application is following simple scalable architecture like one in the following image…

If not, I highly recommend you to take a detour and check one of my previous articles which dives deep on advantages of such architecture and how to implement it 😉
As we have aggreged on the overall architecture, it allows us to take a closer look on its implications for NgRx state features (modules / state slices)
♻️A small recapitulation: In general, when we speak about NgRx state feature (module / state slice) we mean files generated by the
@ngrx/schematics, especially thefeatureschematic which generates the whole state feature.
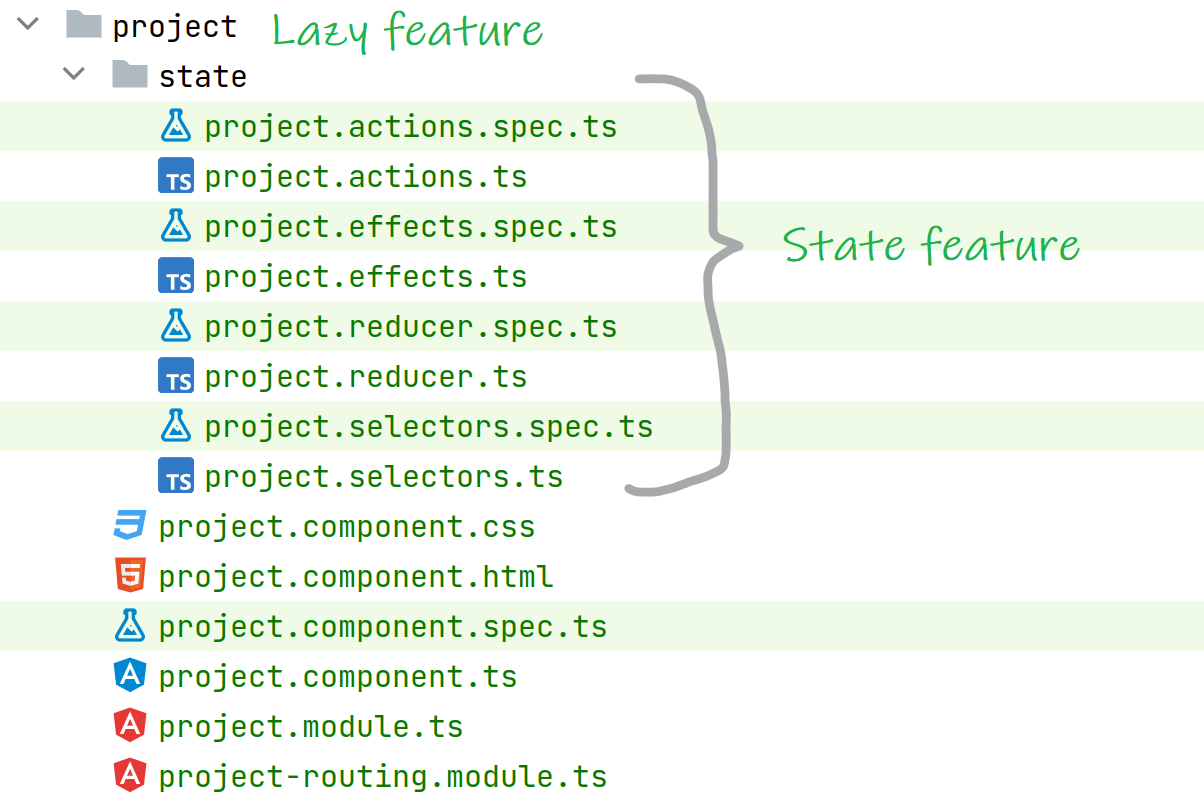
Now, when we develop application it is common to start with single state slice per lazy feature.
As the requirements become more clear or are expanded, it is often the case that we need to access NgRx state slice from one lazy feature in another lazy feature of our Angular application…
⚠️ Importing stuff between sibling lazy features is forbidden because it would break all the benefits of such architecture and could in theory lead also to runtime errors based on order in which user navigated to individual lazy features!
Because of these reasons, the only way to fulfill our requirement is to either:
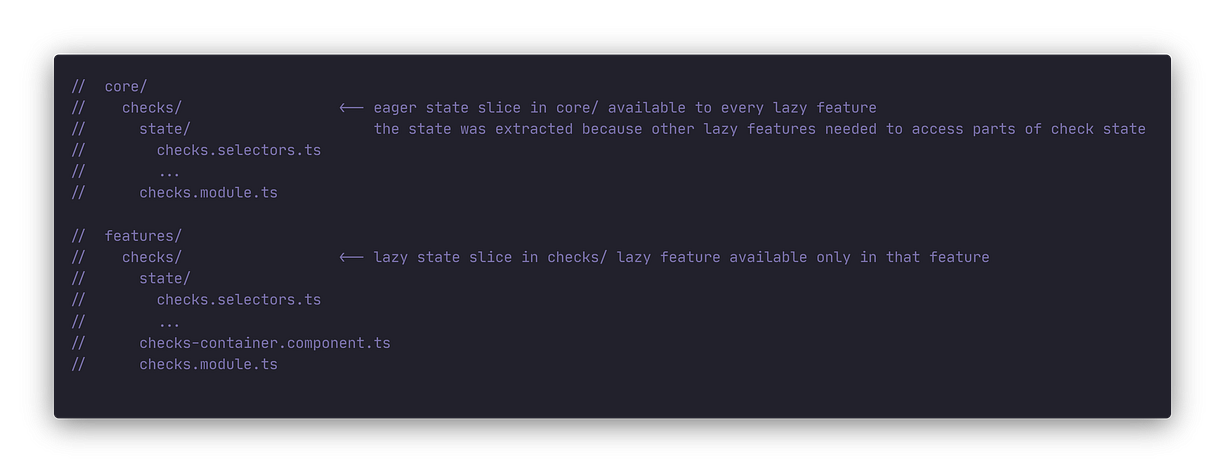
- extract whole state feature into
core/which then can be imported by any lazy feature while preserving clean one way dependency graph - split state feature of the lazy feature into two — reusable state will be extracted in to fresh new state slice implemented in
core/while the lazy feature specific state will stay in that feature
The described application architecture is fractal, which means it can grow infinitely — at least in theory 😅
In practice this means our lazy features can have lazy SUB-features which can have lazy SUB-SUB-features, …
The same rules will apply in those cases, if we had a SUB-feature-A state which we need to access in SUB-feature-B then we have to pull that state slice one level up into parent lazy feature (so not core/, always just one level up)

Follow me on Twitter because you will get notified about new Angular blog posts and cool frontend stuff!😉
NgRx Selectors
Selectors are pure functions used for obtaining slices of store state. More so, selectors are perfect place to create all your derived state. In practice, they are just pure functions without any notion of Angular or RxJs streams so they are naturally easy to write, test and understand!
Create perfect view$ (view model) selector for your container components
One of the best properties of NgRx is that it allows us to minimize implementation of our components which are coincidentally also hardest part of Angular to test, just amazing!
How does NgRx supports us in this case?
Well, our components implementation can be reduced to two concepts
- retrieve and display state from the store using NgRx selectors
- dispatch actions based on user interactions (yes, that actually rhymes)
While this solution is really amazing, especially compared to our standard logic riddled Angular component, developers often choose an approach where they keep adding more and more selectors to the component itself…
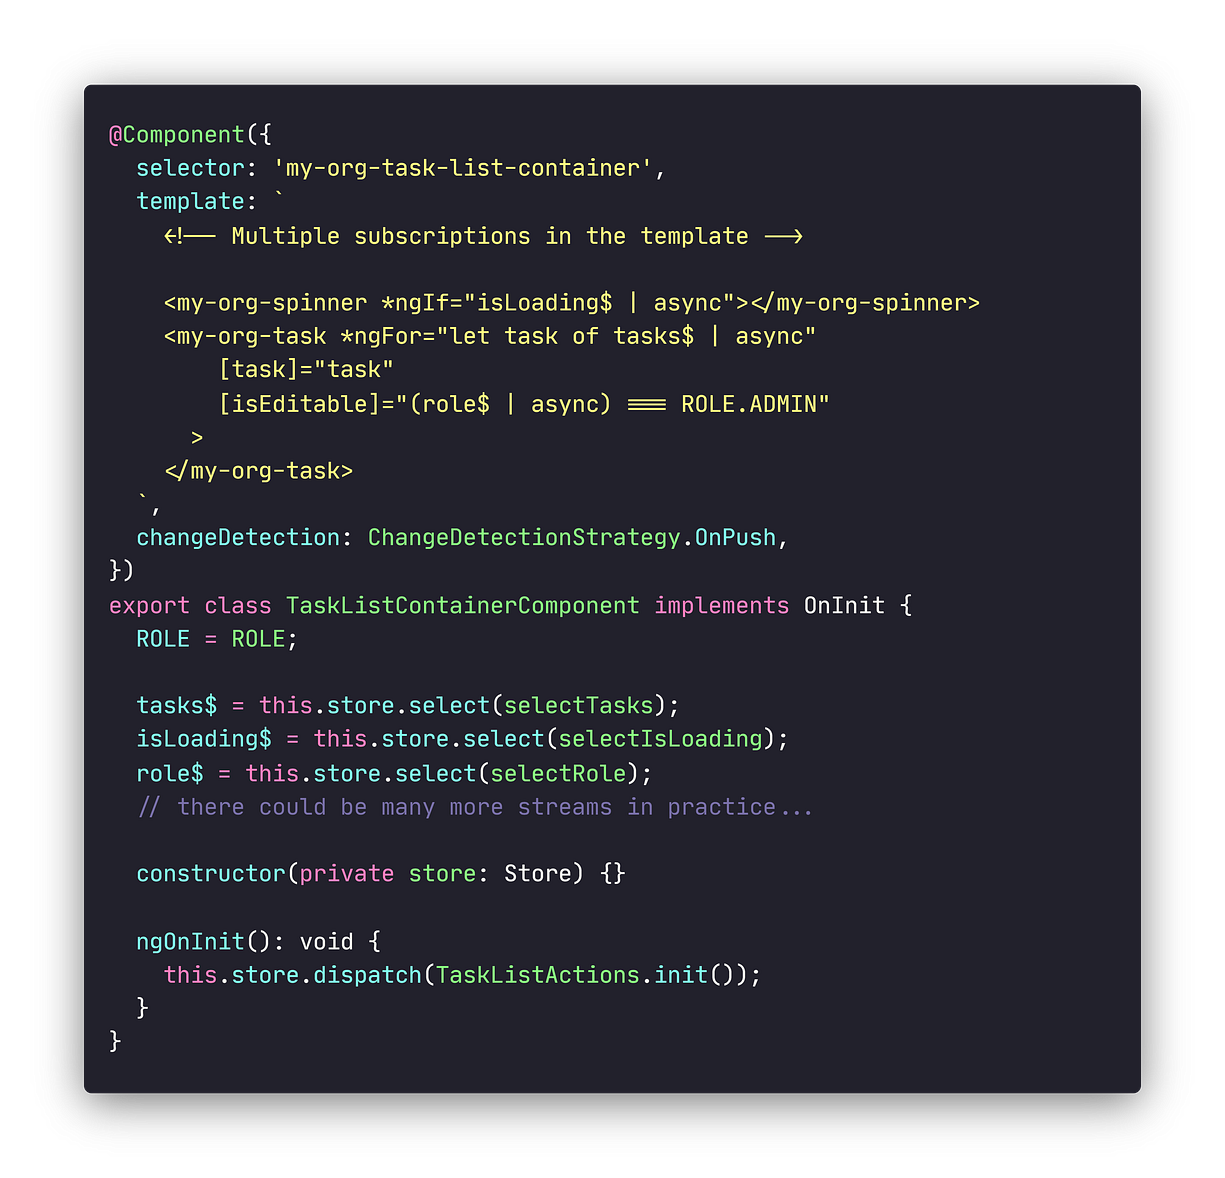
Over time we might end up with many selectors from various state slices. All those independent selectors must be subscribed one by one in the template using the | async pipe. Even worse, we often end up with multiple subscriptions per selector in a single template!
Let’s improve the status quo by introducing dedicated view$ selector for our container component.
The component will use single dedicated “”selector which will deliver tailor made view state which has the perfect shape for the components template so it can be rendered with ease!

Using dedicated view$ selector comes usually hand in hand with wrapping of the whole components template with <ng-container *ngIf="view$ | async as v">.
Once we subscribed to the view$ and unwrapped its value in the local template v variable we can start using it to access any state properties such as v.tasks or v.loading!
Please consider that using *ngIf doesn’t represent any problem with regards to not seeing any content in the beginning (for example, before we loaded data). Subscribing to selector with | async pipe is resolved immediately and the selector will always provide initial value which is at least the initial state from the store.
This goes hand in hand with having explicit loading and error states in our store state slices to show relevant user feedback!
🤔 Consideration: Some developers prefer to store reference to the view selector in the
viewModel$andvmrespectively. Remember, it doesn’t really matter how you call it as long as you implement the concept of dedicated “view” selector for our container components 👍
Another benefit of this approach that if further simplifies testing because we can just mock what this selector deliver for the component view which becomes decoupled from what other selectors are delivering.
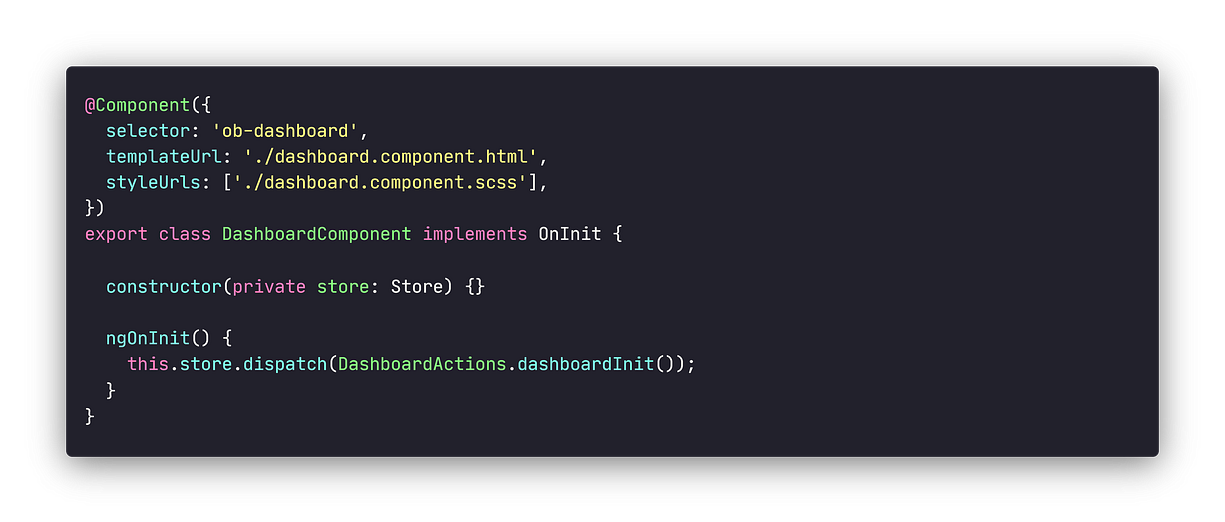
Always use RouterStore and its selectors to access routing state
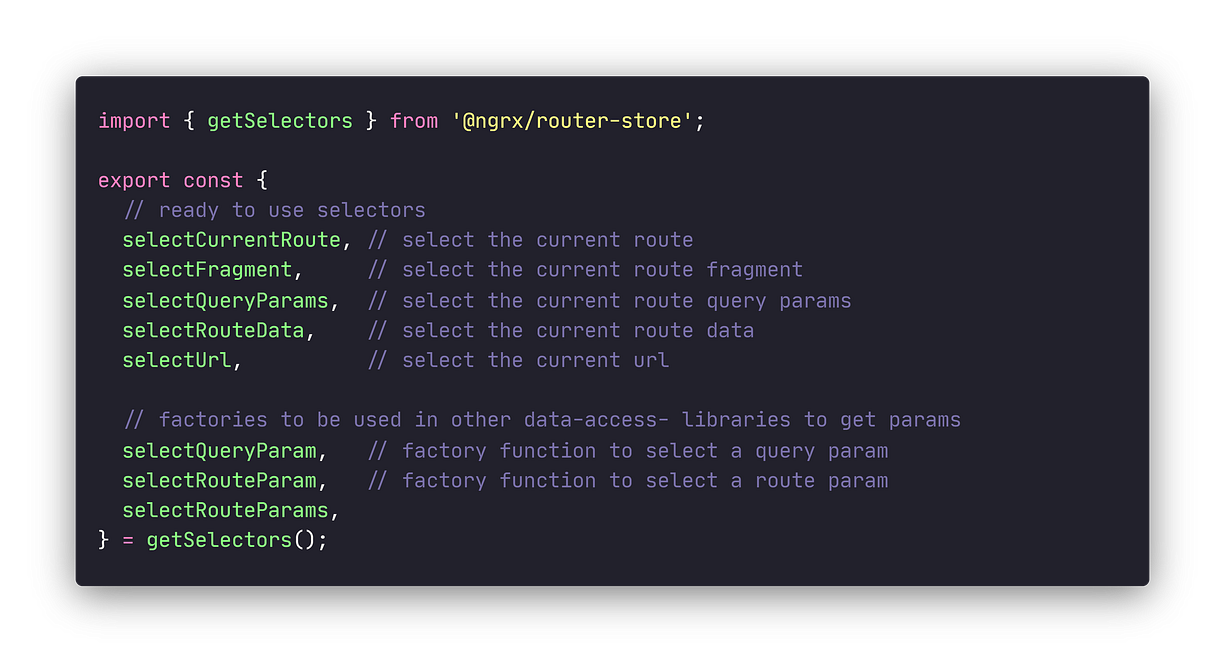
NgRx comes with a nice little package called @ngrx/router-store …
Bindings to connect the Angular Router with Store. During each router navigation cycle, multiple actions are dispatched that allow you to listen for changes in the router’s state. You can then select data from the state of the router to provide additional information to your application — Official NgRx Docs
As highlighted in the quote above, the @ngrx/router-store allows us to access Angular Router state using selectors which is extremely convenient and preferable compared to default way of doing things. Consider the following example…

We need to get selected dashboard ID from the URL and the standard way to do that without @ngrx/router-store would be to inject ActivatedRoute , then retrieve the ID and dispatch appropriate action while manually managing subscription state, there must be a better way!
Imagine a world where you can just…
And retrieve desired dashboardId from URL (path param) using a selector in nice dedicated effect…

The key part here is the selectRouteParam selector factory provided by the @ngrx/router-store , check out the list of all selectors and selector factories available out of the box!
NgRx Actions
Actions are one of the main building blocks in NgRx. Actions express unique events that happen throughout your application. Everything from user interaction with the page, external interaction through network requests, and direct interaction with device APIs, these and more events are described with actions — NgRx Docs
Name your Actions as “Events” instead of “Commands”
Let’s consider the following effect which should reflect userId into the query params of the URL.

There is nothing inherently wrong with the effect itself as it will do its job just fine… Nevertheless, there is still a room for some improvements!
Imagine a situation where a large application might contain a couple of unrelated features which all need to be able to set test user into the query params of the URL.
In that case, we wont be able to really understand what is going on just by observing the list of actions as they happened in the “application history” or more precisely, the actions log of the Redux Dev Tools (browser extension)
Let’s improve our implementation by adjusting the name of the action and the effect itself!
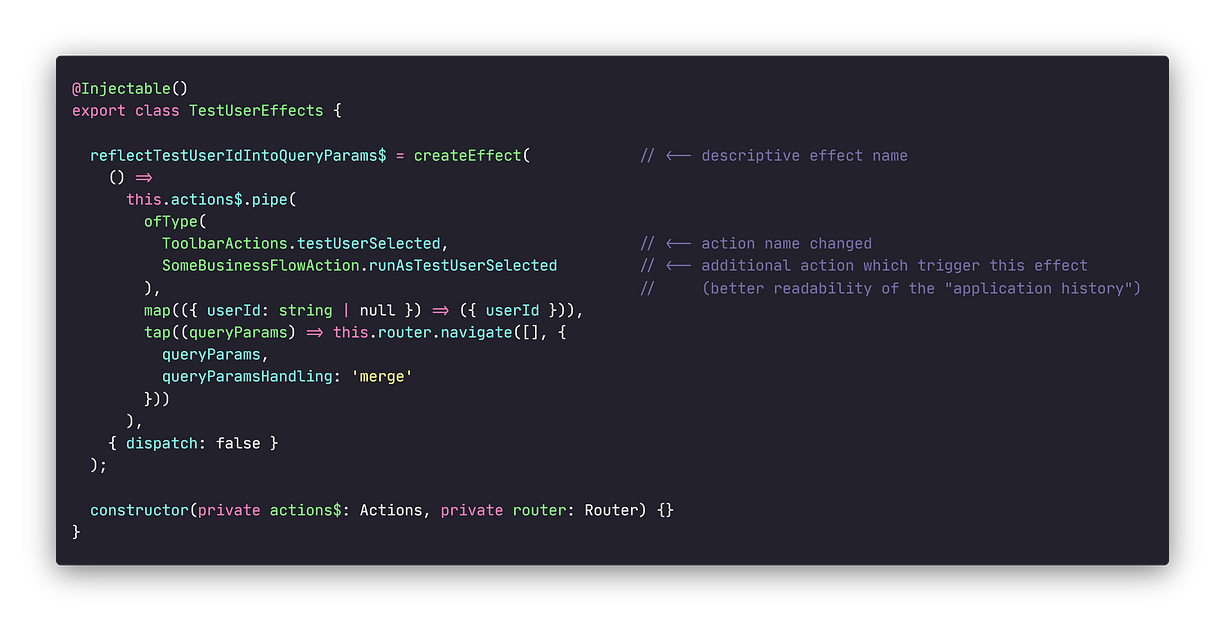
- We renamed the effect itself from
changeTestUsertoreflectTestUserIdIntoQueryParamswhich is much more descriptive - We split action into two (or potentially more) actions based on the action origin
- We renamed actions to follow “event” pattern ( what happened?
testUserSelected) instead of “command” pattern ( egchangeTestUser)
Great, our effect now reads like a sentence!
Reflect test user ID into query params (when) test user was selected (in the toolbar) or (when) test user was selected (as a part of some business flow)
Now that we established that effect describe events which happened in our application, the second point will make much more sense.
The actions should be named in a way which focuses their source (origin) and NOT to their destination (reducer / effect)!
Consider the changeTestUser action which is basically a command which implies it belongs to a “destination” where it will be performed by some logic (either reducer or effect or both).
Such action then might be dispatched from multiple parts of application and we would have no way of knowing what happened just by viewing the application action history in the Redux DevTools…
Now if we name it correctly like an event, for example testUserSelected, we might create many such actions with different origins:
[Toolbar] Test User Selected[Test User Selector Widget] Test User Selected[Some Business Flow] Run As Test User Selected
Naming actions as events gives us much better insight into what is going on in our application!
Embrace local selectors and actions specific to given container, widget or interceptor…
In practice, not every selectors or actions file belongs to a generated state (feature) module (eager or lazy state feature which we would get when running ng g @ngrx/schematics:feature schematics)
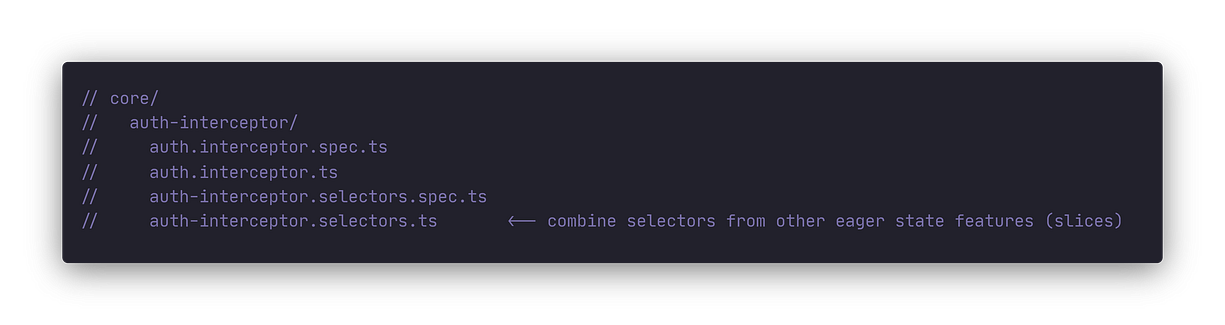
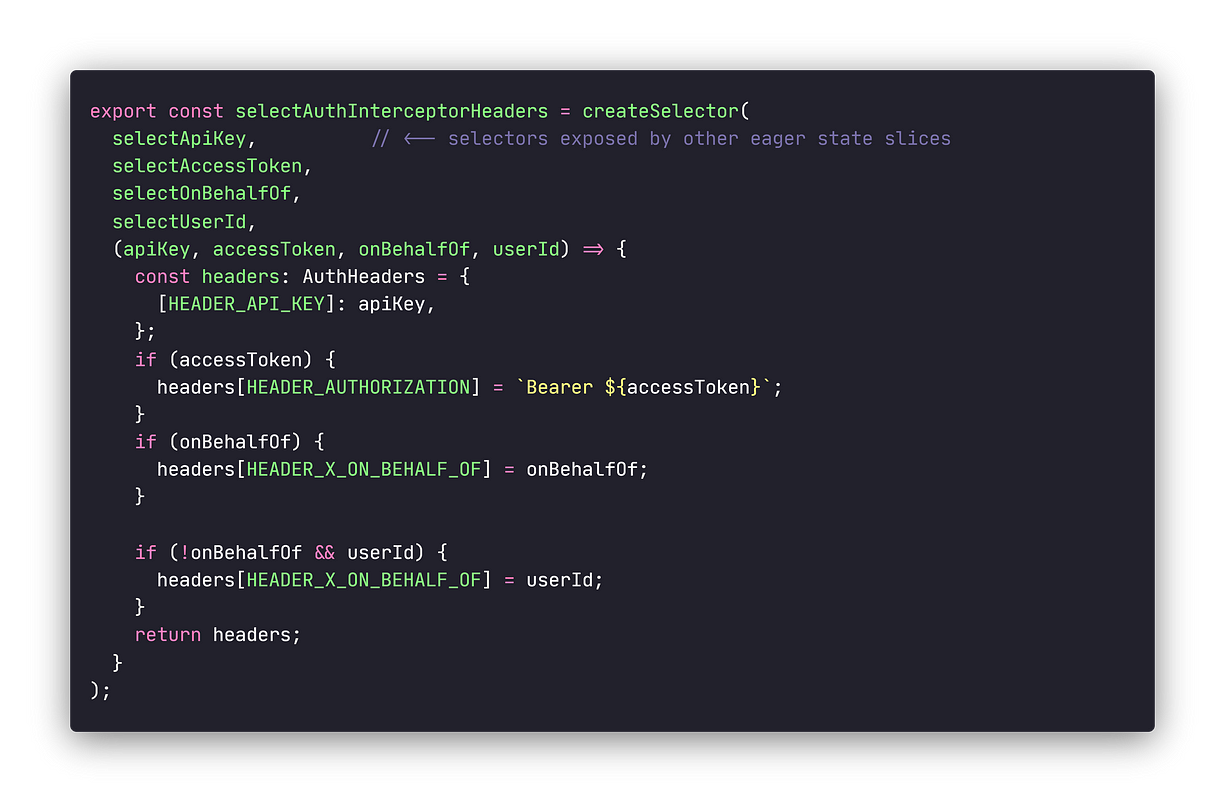
In those cases, it is more than alright to create a dedicated selectors or actions files which is co-located next to it consumer. Consider the following example of auth-interceptor which needs to retrieve state from multiple state slices and because of that we are going to introduce a dedicated selector file.
NgRx Effects
NgRx allows us to implement side–effects as a well defined separate concept with first class support from the library itself!
First class side–effects support sets NgRx apart from the other Angular state management libraries which support it partially or not at all…
Effects are for Orchestration
NgRx effects are dedicated place to implement all the asynchronous flows, processing and any side effects in general…
It’s really great that NgRx prescribes dedicated concept for such type of logic which leads to consistent clean implementation across wide range of application features and applications themselves.
⚠️ While implementing NgRx effects, it might be temping to skip creation of a dedicated feature service and implement all the logic, requests, transformation and what ever have you directly in the effect itself — do NOT do that!
NgRx effects should be as lightweight as possible and the real business logic implementation should be handled by dedicated services
More so, even though is possible to implement complex asynchronous orchestration as a single effect — which means it’s gonna be a complex RxJs stream — it is MUCH better to split it into multiple smaller effects.
Every successful effect is then going to trigger the next one with its success action. This allows also for branching out for multiple parallel processes and eventually collecting all the results for following serial processing steps.

Effects can be triggered by ANY RxJs Observable stream
Most of our NgRx effects are triggered by the stream of actions$. This occurrence is underlined by the fact that when we generate NgRx state feature using @ngrx/schematics the generated effect contains exactly such snippet as an example implementation.

The thing about the effects is that they can be triggered by ANY RxJs Observable stream. This can help us solve many common use cases like:
- triggering of some periodic processing with given interval (eg refreshing of an auth token, uploading of logs to backend, prompting user to take action before she will be logged out, …)
- reacting to some user interaction (eg stream of scroll events to trigger loading of more data as the user scrolls to the bottom of the page, …)

- reacting to the store state changes using NgRx selector as an effect trigger (eg show / hide notification popup based on the amount of notifications in the store, perform something when query params change)

Get comfortable using Redux DevTools
The one of the most important best practices discussed previously is the Name your Actions as “Events” instead of “Commands”. As we apply it to our codebase we will discover an amazing side-effect (not in NgRx sense 😉) that our application history will become much more useful tool for understanding what is going on and what went wrong in case we encounter some buggy behavior.
Make sure that you install and familiarize yourself with the Redux DevTools!
Redux DevToolsRedux DevTools for debugging application’s state changes.chrome.google.com
The Redux DevTools were originally created to provide nice application history and state overview for the apps using Redux state management library.
NgRx implements the same patterns, just in a way that plays really nice with Angular as the host framework. That makes them a natural fit.
NgRx / Redux DevTools integration is implemented in the @ngrx/store-devtools package. It’s definitely a good idea to add this at least in development mode.
As our application and especially managed state grows, we might encounter a new problem…
The state instrumentation for the Redux DevTools basically has to serialize whole application state, for every action that has happened.
As we can imagine, it will get out of hand pretty quickly if our state is large and our application dispatches actions with high frequency. The serialization itself becomes slow (or even grinds to halt) while the memory consumption will be sky high!
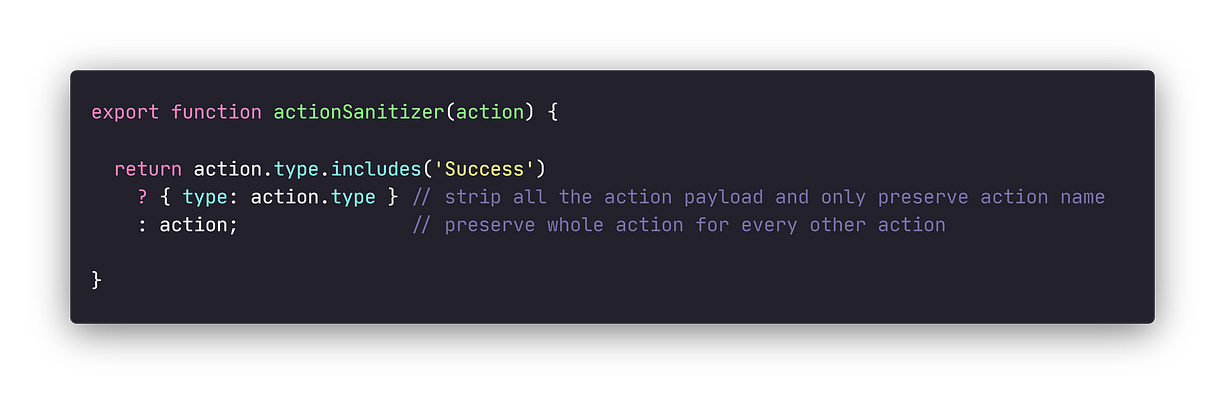
This is definitely NOT what we want but luckily there is a solution. The @ngrx/store-devtools allows us to provide custom implementation for the actionSanitizer and the stateSanitizer .
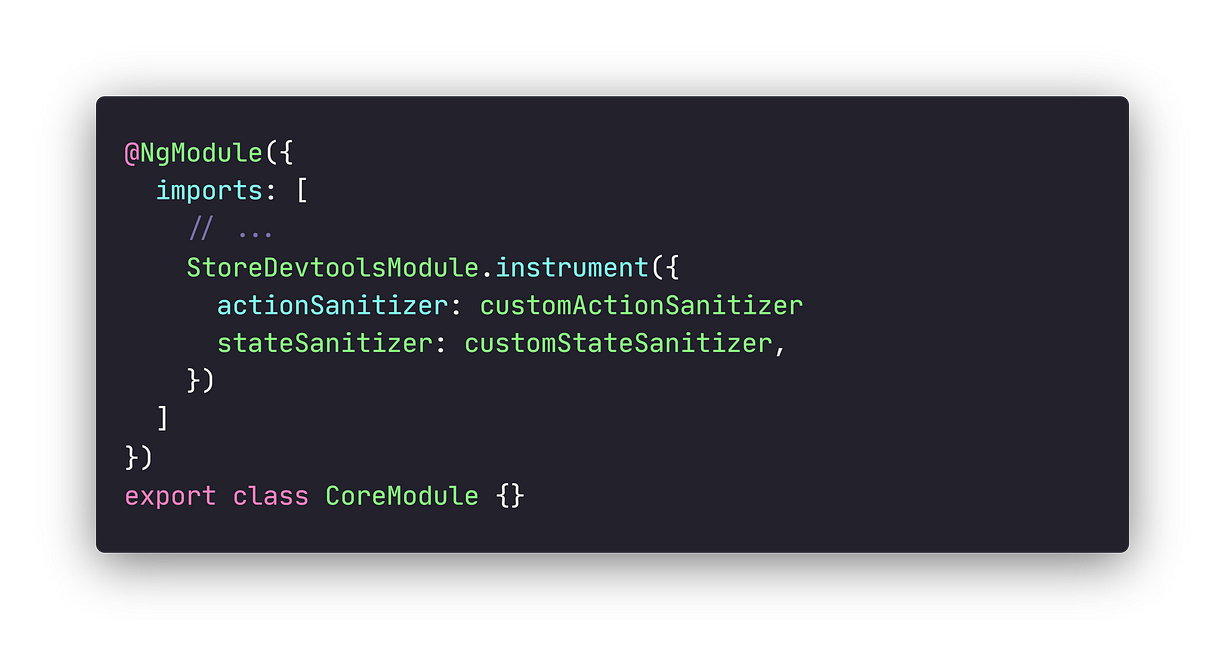
In practice I found it very useful to remove the whole payload from
<LoadSomeData>Successactions as that state can be viewed in the network tab of the browser dev tools so it is not necessary to duplicate it in actions for debugging purposes.
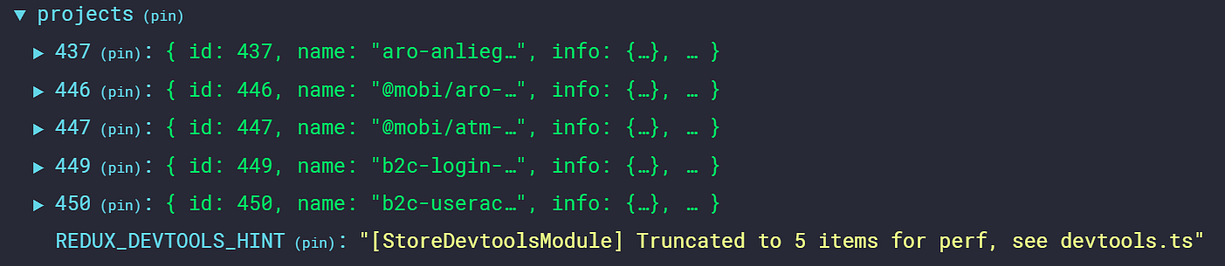
As for the state sanitizer, it will depend on particular application so it’s hard to provide generally applicable guidelines. One example of state sanitizer could be truncating of a long list of large items to let’s say only 5 items…
As of 2022, the Angular + NgRx represents THE BEST COMBO* for high productivity which enables you develop complex and robust frontend applications with clean architecture which can scale to support 10s of features with ease, from solo developers to whole enterprise organizations with many teams and developers!
* if we can assume general competence with both technologies
And that’s it for today! 🔥
I hope You enjoyed learning about real world proven NgRx best practices and what benefits You can reap by implementing these ideas in your projects!
Please support this guide with your 👏👏👏 to help it spread to a wider audience, it would be very appreciated and don’t forget to share it with your collogues who could find these tips useful🙏.
Also, don’t hesitate to ping me if you have any questions using the article responses or Twitter DMs @tomastrajan
And never forget, future is bright

Wanna learn some Angular and You and Your team are from Switzerland or surrounding countries (in person) or worldwide (remote) ? Check out my workshop offer!
Working in large polyrepo enterprise environment ?
Check out OMNIBOARD — the best tool for software architects & engineers that helps them to understand and evolve polyrepo environments of their enterprise organization